Il nostro programma per modificare foto – La capacità di conservare immagini, scene e realtà in un’immagine.
Tuttavia, a volte catturare semplicemente la realtà non è sufficiente per rivelare la vera bellezza di un’immagine. Qui interviene la correzione gamma nel nostro programma per modificare foto, per conferire una nuova brillantezza alle immagini.
La correzione gamma è una tecnica eccellente in questo programma per modificare foto che regola la luminosità di un’immagine. In questa guida, esamineremo più da vicino questa funzione nel programma per modificare foto e come può trasformare le tue foto in opere d’arte artistiche.
Funzioni speciali nel programma per modificare foto:
Il programma per modificare foto si distingue per diverse funzioni senza pari che lo rendono un programma ottimale per la modifica delle immagini. Ecco le caratteristiche speciali che contraddistinguono il programma:
Supporto diretto dal programma per modificare foto:
Una caratteristica notevole del programma per modificare foto è il supporto diretto dalla software. Ciò significa che gli utenti, durante la modifica delle immagini, possono accedere direttamente al supporto e ai video dal programma per modificare foto perfetto. Che tu incontri domande tecniche o stia cercando idee impressionanti, il pulsante di contatto integrato per il supporto semplifica il tuo lavoro.
Il supporto diretto può assumere diverse forme, come video di aiuto integrati, accesso al manuale utente o la possibilità di contattare direttamente l’assistenza clienti. Ciò contribuisce a garantire che tu possa portare avanti il tuo progetto di modifica senza dover abbandonare il programma per modificare foto per cercare informazioni o assistenza.
Funzionalità Greenscreen per l’estrazione degli oggetti:
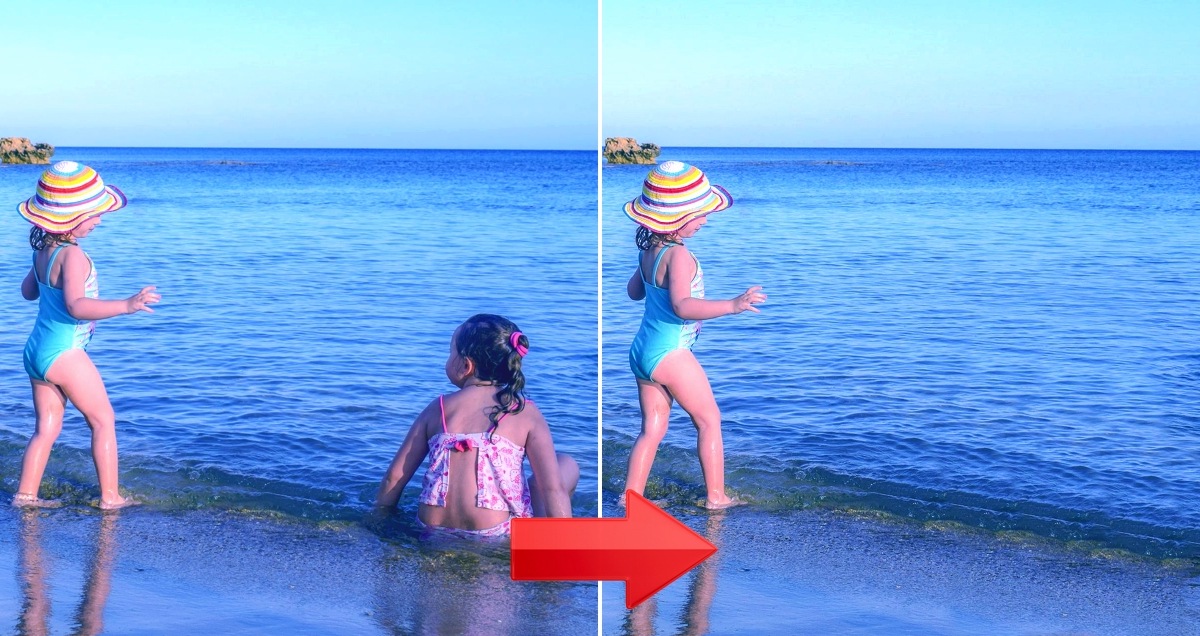
Una delle funzioni utente più eccezionali e utili del programma è la funzione Greenscreen, che esegue un’estrarre molto precisa degli oggetti nelle foto. Con questa tecnica, gli utenti possono portare oggetti o persone su uno sfondo uniforme verde (o fotografarli) e quindi rimuovere lo sfondo usando questo programma per modificare foto. Questo apre molte straordinarie possibilità creative per la composizione fotografica.
Con la potenza della funzione Greenscreen, è possibile creare rapidamente montaggi fotografici realistici, in cui il soggetto principale è posizionato su sfondi diversi. Questo è particolarmente utile per i fotografi che scattano ritratti o foto di prodotti e desiderano regolare lo sfondo a seconda delle esigenze. Che tu appaia in un paradiso esotico o fluttui in un’era fantascientifica, il software ti consente di realizzare le tue idee creative.
I fondamenti della correzione gamma
Prima di approfondire la correzione gamma, è necessario capire cosa sia realmente. Il termine “gamma” si riferisce al grado di variazione della luminosità in un’immagine. La correzione gamma in un programma per modificare foto funziona modificando i valori di luminosità dei singoli pixel nell’immagine. Puoi aumentare la luminosità per schiarire le aree scure o ridurre la luminosità per oscurare le aree luminose. Ciò consente un controllo delicato sulla gamma tonale di un’immagine.
L’importanza della correzione gamma
La correzione gamma nel nostro programma per modificare foto è di fondamentale importanza poiché può influenzare notevolmente la qualità percepita di un’immagine. Senza un’adeguata regolazione di luminosità e contrasto, le foto possono apparire piatte e prive di vita. La correzione gamma consente a fotografi e editori di immagini di sfruttare appieno il potenziale delle loro immagini. Applicando la correzione gamma in modo mirato, metterai in evidenza i dettagli nelle ombre e nelle luci di un’immagine. Ciò porta a un’immagine che appare più vibrante e realistica. La correzione gamma in un programma per modificare foto può anche essere utilizzata per cambiare la mood di un’immagine. Aumentando o diminuendo il contrasto, gli utenti possono creare un’atmosfera accogliente e calda o una sensazione fredda e cupa.
Il programma per modificare foto e la correzione gamma
Il nostro programma per modificare foto ha una funzione di correzione gamma ben progettata che ti consente di ottimizzare le tue immagini in modo semplice e pratico. Che tu sia un fotografo esperto o un principiante nella modifica delle immagini, il nostro programma per modificare foto ha gli strumenti di cui hai bisogno. La funzione di correzione gamma nel nostro programma è facile da usare e offre una visualizzazione immediata delle tue modifiche. Questo programma per modificare foto ha anche l’opzione di apportare diverse modifiche per perfezionare i dettagli nelle tue immagini. Un altro vantaggio della nostra funzione di correzione gamma è la modifica non distruttiva. Ciò significa che le tue immagini originali rimangono invariate mentre apporti modifiche. Puoi tornare al tuo file originale in qualsiasi momento e apportare nuove modifiche senza perdita di qualità.
L’applicazione eccellente della correzione gamma
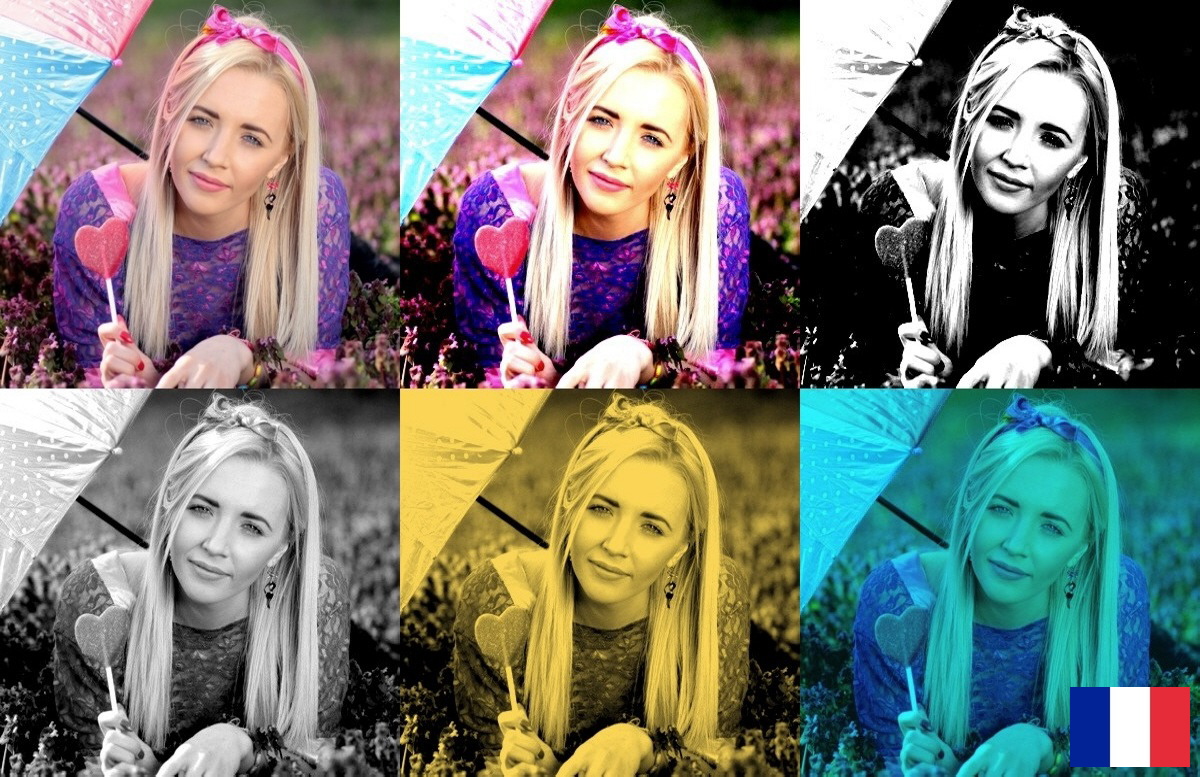
Sebbene la correzione gamma sia spesso utilizzata per riprodurre la realtà nelle foto, può anche essere utilizzata per effetti utili. Fotografi e artisti sperimentano spesso con la correzione gamma in un programma per modificare foto per sviluppare stili e look unici. Modificando miratamente la correzione gamma, è possibile organizzare le foto in creazioni fotografiche. Gli utenti possono creare uno stile vintage con colori sbiaditi e un contrasto delicato o ottenere un effetto High-Key con luci sovraesposte e un bagliore surreale. Le possibilità sono infinite, e la nostra funzione di correzione gamma ti fornisce gli strumenti per realizzare le tue visioni ideali.
La correzione gamma nel programma per modificare foto nella ritocca dell’immagine
Conclusione: Immagini brillanti con la correzione gamma
La correzione gamma in questo programma per modificare foto è una funzione imprescindibile per fotografi e editori di immagini. Ti consente di regolare con precisione la luminosità e il contrasto delle tue foto e di progettare le tue immagini in opere d’arte stilistiche. Che tu voglia riprodurre la realtà o creare effetti brillanti, la correzione gamma offre infinite possibilità. Il nostro programma per modificare foto, facile da usare, rende semplice utilizzare questa tecnica e ti consente di modificare le immagini in modo non distruttivo. Approfitta della correzione gamma per far risplendere i tuoi scatti e realizzare le tue visioni avanzate.
Programma per modificare foto e riduzione delle dimensioni dei file in pochi secondi
In questo articolo, gli utenti apprenderanno come ridurre rapidamente e in pochi secondi le dimensioni dei file delle loro foto grazie al programma per modificare foto.
L’importanza dell’ottimizzazione delle dimensioni dei file: Prima di approfondire come il nostro programma per modificare foto può aiutarti a ridurre le dimensioni dei file, è importante capire perché questo è significativo. I file delle immagini più grandi occupano non solo più spazio sul tuo dispositivo o server, ma richiedono anche più tempo per essere caricati, scaricati e condivisi. Ciò può causare frustrazione, specialmente quando si lavora con connessioni internet lente. Inoltre, i file delle immagini più grandi possono rallentare significativamente i tempi di caricamento di un sito web, compromettendo l’esperienza dell’utente e portando i visitatori a lasciare la pagina. In un’epoca in cui l’usabilità di un sito web è cruciale, l’ottimizzazione delle dimensioni dei file è di grande importanza.
Il programma per modificare foto e l’ottimizzazione delle dimensioni dei file
Il programma per modificare foto è una soluzione versatile per ridurre le dimensioni dei file senza compromettere la qualità delle tue immagini. Che tu stia utilizzando JPEG, PNG o altri formati di immagine, il nostro software ti consente di perfezionare le dimensioni dei file in pochi secondi. L’interfaccia utente del nostro programma per modificare foto è intuitiva, consentendoti di iniziare immediatamente senza la necessità di una formazione complessa. Con pochi clic, gli utenti possono selezionare i propri file di immagine e configurare le impostazioni desiderate per l’ottimizzazione.
Veloce e produttivo: Ottimizzazione in pochi secondi
Il più grande vantaggio del programma per modificare foto è la velocità. Gli utenti possono ottimizzare i propri file di immagine in pochi secondi, senza dover affrontare lunghi tempi di attesa. Il nostro software utilizza algoritmi ottimali che consentono di ridurre le dimensioni dei file senza compromettere in modo significativo la qualità dell’immagine. Ciò significa che è possibile comprimere le proprie foto senza rischiare di artefatti visibili o perdita di qualità.
Impostazioni personalizzabili per risultati ottimali
Questo programma per modificare foto offre anche una serie di impostazioni personalizzabili, consentendoti di adattare l’ottimizzazione alle tue esigenze. Gli utenti possono selezionare il grado di compressione per trovare l’equilibrio ideale tra dimensioni del file e qualità dell’immagine. Inoltre, il nostro programma per modificare foto offre la possibilità di rimuovere i metadati dalle immagini per ulteriori riduzioni delle dimensioni dei file. Questo è particolarmente utile quando si ottimizzano le immagini per il web, poiché dimensioni dei file più piccole possono migliorare significativamente i tempi di caricamento del tuo sito web.
I vantaggi dell’ottimizzazione delle dimensioni dei file
I vantaggi dell’ottimizzazione delle dimensioni dei file in questo programma per modificare foto sono molteplici. In primo luogo, si risparmia spazio di archiviazione sui dispositivi o server, il che è particolarmente importante quando si lavora con spazio di archiviazione limitato. Inoltre, sarai in grado di condividere le tue immagini più velocemente e in modo più efficiente, poiché le dimensioni dei file più piccole richiedono meno tempo per il caricamento e il download. Per i fotografi e i designer grafici che presentano le proprie opere online, l’ottimizzazione delle dimensioni dei file può portare a un’esperienza utente migliorata. Il tuo sito web si caricherà più velocemente e i visitatori potranno navigare più rapidamente attraverso la tua galleria senza dover sopportare lunghi tempi di attesa.
Eseguire comodamente l’ottimizzazione delle dimensioni dei file
La riduzione delle dimensioni dei file è un compito fondamentale nella modifica delle foto, e il nostro programma per modificare foto rende facile completare rapidamente e in modo funzionale questo compito. Con un software user-friendly, opzioni di ottimizzazione veloci e impostazioni personalizzabili, hai il controllo delle dimensioni dei tuoi file di immagine. Che tu sia un fotografo professionista che fornisce immagini ad alta risoluzione ai clienti o semplicemente desideri condividere le tue foto personali, l’ottimizzazione delle dimensioni dei file è un passo essenziale per migliorare le prestazioni delle tue immagini.
Uno sguardo a ulteriori effetti speciali nel programma per modificare foto:
In questo programma per modificare foto, ci sono ulteriori effetti speciali che ampliano le tue opzioni di modifica delle immagini. Ecco un’anteprima di questi effetti:
- Effetto Color-Splash: L’effetto Color-Splash è una funzione molto bella che consente di evidenziare determinati colori in una foto, mentre il resto dell’immagine rimane in bianco e nero. È utile per attirare l’attenzione dell’osservatore su elementi o aree specifiche dell’immagine. È particolarmente utile per aggiungere accenti di colore a immagini in bianco e nero e ottenere effetti creativi.
- Filtro di equalizzazione: Il filtro di equalizzazione è uno strumento che consente di bilanciare il contrasto e la luminosità in un’immagine. È utile per illuminare le immagini, migliorare le aree scure e bilanciare i toni per ottenere un’immagine equilibrata.
- Filtro Bumpmap: Il filtro Bumpmap è uno strumento potente che consente di applicare texture di superficie ed effetti di rilievo alle tue foto con il programma per modificare foto. Ciò conferisce alle tue immagini una texture tridimensionale e una profondità che è particolarmente utile nella modifica di texture e materiali.
- Filtro lente: I filtri lente offrono molte applicazioni significative per modificare le tue foto. Puoi aggiungere riflessi, diffrazioni luminose ed effetti di luce per creare un’atmosfera magica e sognante nelle tue immagini.
- Ottimizzazione automatica delle foto: La funzione di ottimizzazione automatica nel programma per modificare foto è ideale per coloro che desiderano ottenere rapidamente e senza complicazioni i migliori risultati dalle loro foto. Analizza la tua immagine e applica automaticamente aggiustamenti come luminosità, contrasto, nitidezza e correzioni del colore per migliorare l’immagine.
Dare voce alle immagini – Aggiungere testo con il programma per modificare foto
In un programma per modificare foto non si tratta solo di creare l’immagine perfetta.
Uno dei modi più efficaci per raggiungere questo obiettivo è utilizzare il testo. Con il programma per modificare foto, puoi fare esattamente questo: dare voce alle tue immagini. Aggiungendo del testo, gli utenti possono trasmettere contesto, emozioni o informazioni che l’immagine da sola non potrebbe comunicare. Che si tratti di una citazione ispiratrice, una breve descrizione o semplicemente della data e del luogo in cui è stata scattata l’immagine, il testo può ampliare significativamente il significato di una foto. Il programma per modificare foto ha una funzione di modifica del testo ideale ma potente, per inserire testo sulle tue immagini. Sia che tu sia un fotografo professionista che crea immagini per i clienti o un appassionato di fotografia che condivide le proprie foto sui social media, il nostro software offre gli strumenti per personalizzare le tue immagini e comunicare il tuo messaggio. Gli utenti possono scegliere tra una varietà di caratteri e stili di testo per ottenere lo stile desiderato per le loro immagini. Inoltre, il processo consente di regolare le dimensioni, il colore e l’allineamento del testo per assicurarsi che si integri perfettamente nell’immagine. Ciò garantisce di posizionare il testo in modo armonioso nell’immagine, attirando l’attenzione su ciò che è davvero significativo.
Con il programma per modificare foto e l’aggiunta di testo alle immagini, è possibile raccontare storie.
Gli utenti possono utilizzare un breve testo per introdurre lo spettatore alla storia dietro la loro foto, aggiungere un colpo di scena o persino creare un cliffhanger che suscita la curiosità. La combinazione di immagini e testo crea un legame più profondo con lo spettatore e invita a esplorare l’immagine. Per i fotografi che presentano le proprie opere su social media o su un sito web, l’aggiunta di testo può anche contribuire a trasmettere il significato e il contesto delle tue immagini. Gli utenti possono utilizzare didascalie per fornire informazioni sull’immagine o sulla sua posizione di scatto. Questo è utile quando si utilizzano le foto per la documentazione o come accompagnamento visivo a un testo o articolo del blog. Aggiungere testo alle tue foto può anche aiutare a stabilire il marchio o lo stile personale. Se crei regolarmente immagini con un programma per modificare foto per la tua azienda o condividi le tue fotografie sui social media, l’aggiunta del tuo logo o di uno slogan di marca a ogni immagine può creare un’identità coerente. Allo stesso modo, i fotografi dilettanti possono aggiungere un tocco personale alle loro immagini, inserendo il proprio nome o un elemento distintivo. Questo consente di contrassegnare le proprie opere e di farle distinguere dalle altre.
L’applicazione della funzione di modifica del testo è estremamente semplice. Dopo aver aperto la tua immagine nel programma per modificare foto, seleziona l’opzione “Aggiungi testo”. Quindi inserisci e personalizza il testo desiderato. Puoi selezionare il tipo di carattere, la dimensione, il colore e l’allineamento del testo e trascinarlo sulla posizione desiderata nell’immagine. Il nostro software include anche una funzione di anteprima che ti consente di vedere le modifiche in tempo reale prima di salvarle. In questo modo, puoi garantire che il testo si adatti perfettamente all’immagine. Con il nostro eccellente programma per modificare foto, valorizzi le tue immagini aggiungendo loro una voce. Che tu voglia raccontare storie, fornire informazioni o contrassegnare le tue opere, la scelta è tua. Rendi le tue immagini più significative e riconoscibili, e dagli una voce che sarà ascoltata.
Ulteriori informazioni sul nostro programma per modificare foto sono disponibili qui.